Project 2
Printing text on an ASCII LCD module
Basics
Though there are other types, LCD modules available today usually contain
a built-in controller (e.g. Hitachi HD44780). Thus such a module can be
connected directly to a microcontroller to print ASCII characters withotu
much effort. The 8 bits needed per character are transferred either on
8 parallel lines or sequentially on 4 lines. This way it's possible
to connect the data lines to one port on 8bit controllers as well as on
4bit controllers.
Additionally to the data lines there are 3 control lines (RS, RW, E)
and connectors for voltage, ground and a contrast adjustment voltage.
| 1 |
ground (0V) |
| 2 |
supply voltage (+5V) |
| 3 |
Vc (contrast control voltage) |
| 4 |
RS (Register Select) |
| 5 |
R/W (Read Write Select) |
| 6 |
E (Enable Read/Write) |
| 7 |
D0 (data bit 0) |
| 8 |
D1 (data bit 1) |
| 9 |
D2 (data bit 2) |
| 10 |
D3 (data bit 3) |
| 11 |
D4 (data bit 4) |
| 12 |
D5 (data bit 5) |
| 13 |
D6 (data bit 6) |
| 14 |
D7 (data bit 7) |
Using the voltage Vc the display contrast is adjustable. The lower Vc,
the higher the difference between the supply voltage and Vc and the higher
is the contrast.
"RS" decides, whether a sent byte contains data or a command (0: command,
1: data).
"RW" says, whether data/commands should be read or written (0: write,
1: read).
"E" tells, whether data/commands are (to be) transferred (falling edge
marks valid data).
Using the 4bit mode, only data lines D4-D7 are used and the higher
nibble is transferred before the lower nibble.
Hardware
I'm using a 16x2 LCD module from Conrad (BN183342-66, DM 38,50), other
modules from 16x1 till 40x2 are usable with minimal changes. Different
formats (1x8 till 4x40) will need some more modifications; I can't really
tell since I don't have docs or samples to test. Anyway, it's important
that the module has the 14 connectors described above.
Owners of an STK200/300 just have to build an adaptor cable to connect
the 14pin connector on the eva board to the connectors on the lcd; then
the display contrast can be easily adjusted with the trimmer.
This connector is however somewhat limited regarding the controller
and method of control used. To explain this further, I will comment on
the both modes you can drive an lcd display:
1) IO mode
Using the IO mode, the control lines are toggled manually: to send data
to the LCD, you have to set R/W high. You have to set R/W low, wenn reading
from the LCD (e.g. busy flag). RS must be set to 1 to receive/sent data
and 0 to receive/sent commands. Last but not least you have to create a
falling edge on the E(nable) line. In the program, this is done the following
way:
sbi(LCD_E_PORT, LCD_E_PIN); asm volatile ("nop" ::)
cbi(LCD_E_PORT, LCD_E_PIN);
2) Memory mapped mode
To use this mode, the controller has to support external SRAM. Apart from
the MegaAVRs this is only true for the 8515 and 4414. With an appropriate
external circuit the LCD can be accessed by reading from/writing to the
(virtual) external SRAM. The data lines have to be connected to Port A,
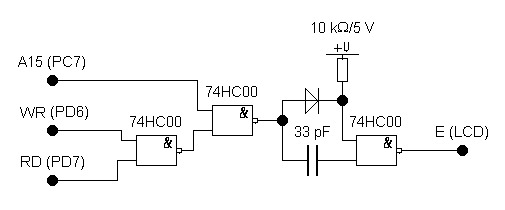
RS on the LCD to Port C6 (A14) and R/W to Port D6 (WR). The enable signal
E ist created using the following circuit:
 Now I should mention how data is sent to the LCD (reading works the same
way):
Now I should mention how data is sent to the LCD (reading works the same
way):
*(char*)(0xC000) = data;
bzw.
*(char*)(0x8000) =
function;
The (pseudo) memory address is 16bit wide, the low byte is put out
on Port A, the high byte on Port C. The both most significant bits are
A14 (PC6) and A15 (PC7). For a function/command (0x8000 = 1<<15)
A15 is logical 1 and A14 logical 0, for data (0xC000 = (1<<14) +
(1<<15)) A14 and A15 are logical 1.
Looking at the circuit you can see, that the output of the 2nd NAND
can only be 0, if A15 == 1 and R/W or RD oder both are logical 0. A15 ==
1 ist always true since bit 15 is set in 0x8000 as well as in 0xC000. WR
resp. RD becomes 0 (both signals are inverted in fact) while reading/writing
for short period (increased to two CPU cycles by enabling a waitstate).
One input of the last NAND is always logical 1, so just the 2nd input
influences the output. In summary, the output of the last NAND becomes
1, if WR and RD are logical 1 and becomes 0, if WR and/or RD are logical
0 (during read/write cycles).
To be honest, the diode and capacitor puzzled me a bit, because they
don't make sense for an "ideal" NAND. For the 74HC00 used in the circuit,
the capacitor seems to limit the low period of the last NAND's output to
2ms. What the diode is for, remains uncertain to me.
IO mode on an STK board
On the one side, the memory mapped mode is a nice thing, because on an
STK board you can connect and drive an lcd module with minimal effort (in
software and hardware). The drawback is however, that this is only possible
with AVRs supproting external SRAM (8515, 4414, Megas). Furthermore, using
the STK200, the controller has to have an Port A and has to be placed in
the "40PIN Digital" socket. Because other 40pin controllers have another
pin layout (Vcc, GND), they can't be even used in the digital socket.
But even if you want to use an 8515 or 4414 in IO mode, the external
circuit becomes a problem: the lcd's enable line E is not connected directly
to an mcu pin, but via the above circuit. Because of this, you have to
consider the mcu pins WR and RD, too. Fortunately, the lcd connector can
be used only if Port D7 (RD) is set to 0 permanently.
How useful this is, can be questioned, of course.
Commands
The following commands to the lcd are defined:
| Befehl |
RS |
RW |
DB7 |
DB6 |
DB5 |
DB4 |
DB3 |
DB2 |
DB1 |
DB0 |
Description |
t |
| Clear |
0 |
0 |
0 |
0 |
0 |
0 |
0 |
0 |
0 |
1 |
Clear Display, return cursor
home |
<1,64ms |
| Home |
0 |
0 |
0 |
0 |
0 |
0 |
0 |
0 |
1 |
* |
Return Cursor Home |
<1,64ms |
| Entry Mode |
0 |
0 |
0 |
0 |
0 |
0 |
0 |
1 |
I/D |
S |
Set Cursor move direction (I/D) and display shift (S) |
40us |
| Display On/Off |
0 |
0 |
0 |
0 |
0 |
0 |
1 |
D |
C |
B |
Display on/off (D), Cursor on/off (C), Cursor blink (B) |
40us |
| Cursor/Disp shift |
0 |
0 |
0 |
0 |
0 |
1 |
S/C |
R/L |
* |
* |
Move Cursor (C), shift Display (S) |
40us |
| Function |
0 |
0 |
0 |
0 |
1 |
DL |
N |
F |
* |
* |
Set data length (DL), number of lines (N) and font (F) |
40us |
| Set CG RAM |
0 |
0 |
0 |
1 |
A5 |
A4 |
A3 |
A2 |
A1 |
A0 |
Set CG RAM address |
40us |
| Set DD RAM |
0 |
0 |
1 |
A6 |
A5 |
A4 |
A3 |
A2 |
A1 |
A0 |
Set DD RAM address |
40us |
| Read busy flag |
0 |
1 |
BF |
A6 |
A5 |
A4 |
A3 |
A2 |
A1 |
A0 |
Read busy flag (BF) and address counter. |
40us |
| Write Data |
1 |
0 |
D7 |
D6 |
D5 |
D4 |
D3 |
D2 |
D1 |
D0 |
Write data into RAM |
40us |
| Read Data |
1 |
1 |
D7 |
D6 |
D5 |
D4 |
D3 |
D2 |
D1 |
D0 |
Read data from RAM |
40us |
I/D = 1: Increment (+), I/D = 0: decrement (-)
S = 1: Display shift
S/C = 1: Display shift, S/C = 0: cursor
move
R/L = 1: Shift right,
R/L = 0: shift left
DL = 1: 8bits,
DL = 0: 4bits
N = 1: 2 lines,
N = 0: 1 line
F = 1: 5x10dots,
F = 0: 5x7dots
BF = 1: busy,
BF = 1: ready
Software
The program is split into different modules again:
| main.c |
Initializes modules and prints text on the lcd. |
| timer.c, timer.h |
Defines delay function |
| lcd.c, lcd.h |
Defines LCD related functions/definitions |
| global.h |
Global definitions |
All LCD related functions are defined in module "lcd". The following
functions are exported:
| void lcd_init(u08 cursor, u08 fnc) |
Initializes the display. |
| void lcd_clrscr(void) |
Clears display. |
| void lcd_home(void) |
Sets cursor back to home position. |
| void lcd_gotoxy(u08 x, u08 y) |
Sets cursor to position (x,y). |
| void lcd_putchar(u08 data) |
Prints character at the current position. |
| void lcd_puts(char s[]) |
Prints string at current position (no auto newline). |
| void lcd_command(u08 cmd) |
Sends command to LCD |
1) Initialization
When initializing using lcd_init(), the cursor mode and lcd function have
to be given.
For cursor mode, the following bits are defined:
LCD_ON_CURSOR, LCD_ON_BLINK
To turn the cursor on, you have to pass the follwoing to lcd_init():
(1<<LCD_ON_CURSOR)
To turn a blinking cursor on, you have to use:
(1<<LCD_ON_CURSOR) | (1<<LCD_ON_BLINK)
or 0 to hide the cursor.
For the lcd function, the following bits are defined:
LCD_FUNCTION_8BIT, LCD_FUNCTION_2LINES, LCD_FUNCTION_10DOTS
Same procedure as for the cursor, e.g. to use 2 lines, 8bit mode and
5x7dots font, you have to pass:
(1<<LCD_FUNCTION_8BIT) | (1<< LCD_FUNCTION_2LINES)
BTW: 4bit mode is not (yet) supported, since this is quite useless
in memory mapped mode and complicates everything in IO mode.
2) Sending commands
Using lcd_command(), you can send any command from the above table to the
lcd. The command bits are defined in "lcd.h" which have to be combined
as for lcd_init(). In contrast to the parameters in lcd_init the command
byte has to include the appropriate command bit. To switch the cursor off
for example, you have to use the following command:
lcd_command((1<<LCD_ON) | (1<<LCD_ON_DISPLAY));
This corresponds with "00001100" (only data bits) from the above
table and turn the display on, but the cursor off.
3) Adapting to your own needs
By definitions at the start of "lcd.h" you can adapt the module to your
own needs:
#define LCD_LINES
2 /* visible lines */
Defines whether to use one or two lines.
#define LCD_LINE_LENGTH 0x40
/* internal line length */
Sets internal line length (should be ok for most displays, also if
only 8 or 16 characters displayed).
#define LCD_8BIT_MODE
1 /* 0: 4bit, 1: 8bit */
Don't change this, since 4bit mode is not (yet) supported.
#define LCD_IO_MODE
1 /* 0: memory mapped mode, 1: IO port mode */
The memory mapped mode (0) only works under the conditions described
above.
For IO mode, the ports/pins used can be changed shortly after this
definition.
#define LCD_HW_ENABLE
0 /* 0: normal IO, 1: IO mode on STK200/300 */
To use IO mode on an STK board, set this to 1.
4) Output
If everthing works as expected, the lcd shows the following text after
startup:
AVR-GCC LCD demo
loop: 00000 |
The number after "loop" is increased permanently; if 65535 is reached
the counter restarts at 00000.
Download
AVR program
back to homepage